31 March 2013

March Wrap Up

March 25, 2013
March Goals
Ready 5+ books
Give away Happily Ever After Quilt
Wedding Trip
Progress on Welcome Baby Packages (3). Hopefully:
  • Complete Quilt A and Quilt B tops and backs Whew! Just minutes ago! More on that soon.   
  • Baste both quilts
  • Begin quilting - I've been sketching and trying to come up with ideas... but no plan yet. 
  • Prep work shopping 
  • Set aside some funds for said shopping
Make progress on long term 'no progress' items. Specifically: 
  • Pansy Patch - work on finishing the top at least I actually don't know where this project is. Finding it is going to have to be step one. Hmm... 
  • Make a plan for the backs of the denim quilts I think I have a plan, but I'm a bit low on fabric money at the moment - another reason for all the bags and things from my stash this month! 
Clarinet. Practice. Clinic. Band.
Sell other car? 

March 31, 2013 - Finally seeing some green! 

I have seriously struggled to get back on track after the wedding, road trip and time change. And I've spent way too much time trying to come up with a Google Reader replacement. It's just been a bit of a dud month - not enough energy for the wants and barely enough for the needs. Some months are just less successful than others - both in terms of my goals and my personal energies. That's okay. 


29 March 2013

The Recipe

I come from a big, loud, close family. We're talking at least three family reunions a year, each a potluck picnic, and most of them with more than 50% overlap despite a different last name before "family reunion." Christmases and Thanksgivings were usually huge dinners - complete with about 50 guests each.

In all these reunions and holiday dinners, there is a single meal that stands out above the rest. This meal is a direct link to my ancestors, not only the ones I've met and eaten it with, but the ones who came long before my time.

Potatoes and Dumplings
Green beans; peas in cream; salad
Bread with butter and strawberry freezer jam
Wonderberry pie with homemade vanilla ice cream

I have eaten this growing up at nearly every family member's dinner table - my parents, my grandparents, my aunts. In college, my brother regularly made Potatoes and Dumplings on the weekends. And now, my husband and I eat it at our table too.

If I only pass on one recipe to somedaykid, this is it.

There's nothing measured about this recipe. I suppose that might be frustrating for someone trying to follow the recipe, but it makes me think about the families who passed this recipe down, adapting it to how ever many people were eating that night or throwing ingredients around as thirteen siblings raced in and out of the kitchen.

Potatoes and Dumplings
1 potato per person
1/2 cup flour per person
1 egg per person
Butter*
salt

Peel potatoes and cut them into bite size pieces. Put the potatoes in a large pot with salted water. The water should cover the potatoes by a couple inches. Cook at a slow boil.

Place the butter in a skillet and slowly brown. Keep an eye on this - it's easy to miss the moment and end up with burnt butter.

Combine flour, eggs and salt (go easy, it's always easy to add more to the finished plates) until you have a sticky dough.
Not a great picture, but something like this.
Test potato 'doneness.' My brother prefers his a little firm, able to maintain the shape. I like mine to cook a little longer so some of them will fall apart into a more mashed potato consistency.

When the potatoes are done to your preference, begin dropping small spoon fulls of dough on top of the boiling water. The dough will rise when it's cooked. This doesn't take long, and most of the dumplings will already be floating by the time you get the last ones dropped in. To be safe, give it a little more time for those last few - we're talking a minute or less.

Drain off the water. Place the potatoes and dumplings in your serving bowl. Pour the browned butter over the top. Stir to mix and coat everything in butter. Now's the perfect time to test a bite (some potato, some dumpling) to see if you were right on the salt or if it needs more. We usually end up adding more at this point, but I'd rather add more after the cooking than wish the dumplings weren't so salty!


Enjoy!

This is the meal that takes me back to my childhood, my family, my roots. This is what I crave when things are rough, or when I want to celebrate. This is my comfort food.

My husband, who grew up with salsa and sauces, used to look down his nose when I described a meal that's basically potatoes with salt and butter. Until he tried it. Now, he's the one requesting it.


*How much butter to use is up to you. My guidelines is 5 potatoes: 3/4 stick butter, 7 potatoes: 1 stick butter, etc. And despite the 1 potato per person rule, I've never made a batch smaller than 5 potatoes, even for two people...
27 March 2013

Twin Quilts: Starting on Quilt B

Clearing enough space in my house to baste a quilt can be a massive undertaking - so I'm scurrying to get Quilt B caught up in the hopes I can baste both quilts at the same time.


You would think that because this is my second time through the same process I would be a bit faster. You would be wrong.


2 episodes of Bunheads, 1 Kitchen Nightmares, 1 Suburgatory, and what do I have to show for it besides an empty Hulu queue?

Most of a quilt top.

Except somehow I wound up with an upside down section, so I'm taking a break. I think I've either got to unpick one section (not impossible, but not fun) or do a little fancy thinking to get things back on track. I'm hoping the answer comes to me in a dream tonight.

25 March 2013

Pinterest Challenge: Scarf Shirt

I can't remember a time when I've ever worn a scarf. Which is odd considering how many of them I own. Fashion scarves decorate vases, and winter scarves just languish in my closet. When I had longer, static prone hair, even touching a scarf or winter hat was a recipe for disaster. The day after my short hair cut, I spent a couple hours trying to figure out a way to wear scarves like headbands. I didn't have to deal with any static. But I didn't come out of the experimentation with anything worth trying again.

The pile of scarves kept mocking me. And I kept meaning to add them to the give-away pile. Because my home is too small to hold things I don't use.

Then I came across a pin for a Scarf Shirt tutorial. Did I have some reservations? Absolutely. I love the look of it over at Stars for Streetlights, but as a fat* woman I had some serious hesitation about wearing something like that.

I started with a low-commitment version. After picking two scarves that were close to the same size, I used small safety pins to make a mock-up top. A little adjusting of the pins to make things fit better, and all in all, I was pretty pleased.

I deconstructed the whole thing, and put it back together right sides facing in. Since my safety pins had left small holes, I was able to pin it together with straight pins without needing to remeasure where my stitching should be.

Instead of stitching just a few strategic spots quiet like the tutorial, I went with four longer lines of stitching under each arm and across the shoulders.
Kind of like this... 
I didn't stitch all the way to the outside edge on either of my four lines of stitching because I wanted to keep some of the looseness of the original - and because I knew I'd need the room around my waist/hips.

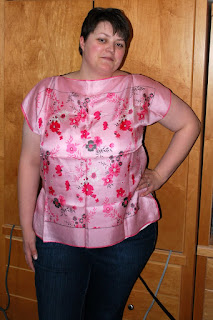
Flipped it back outside-out and tried it on. I even roped my husband in to taking a couple pictures of me.

Front
Obviously it needs some dewrinkling to get those lovely fold lines out...

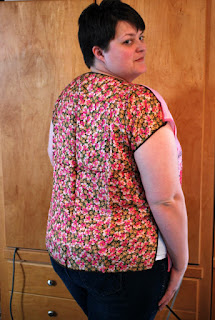
Back
I actually like the brown/print 'back' better. And while it is fully reversible, the pink/boxy 'front' just doesn't work (for me) as a back. You can also see the white tank top peaking out at the bottom where I left it open to give me a bit of extra room. 

I'm debating wearing it out tonight... I'm also digging through my collection for another large square (I have a lot of rectangles). I've got a lovely teal/green/cream that I would love to turn into a shirt - but so far no luck on finding a back for it. I might just have to go thrifting soon if I don't find something in my stash - although I suppose I could make a 'scarf' out of strap fabric for the back (especially if I get smarter with the overlock machine). Hmm...

Anyway - I'm pretty thrilled with the outcome. The hardest part was trying to stitch through the silky fabrics (practically impossible to back stitch, at least on my machine), but the entire project took about 10 minutes. A second one should take even less since I should be able to mark my stitch points based off this one rather than pinning it while wearing it. 


* Getting personal here: I realize 'fat' is a word that makes some people uncomfortable, but I'm more comfortable using it to describe my body than using words like chubby, curvy, plus size, or any of the other alternatives I've heard of. Loving my body (or even appreciating it) is an ongoing process for me, as is learning what kind of outfits make me happy/comfortable. Using the right-for-me words plays a part in that process. 


22 March 2013

Progress


Happily Ever After Quilt DONE! 


Recent Progress: Done and given away!

Quilt A and Quilt B


A: piece top, piece back, baste, quilt, bind - some progress has been made
B: piece top, piece back, baste, quilt, bind - fabric is sorted, cut, top in progress


Monkey Blocks

Yet to Do: back, baste, quilt, wash

Semi-Sampler (small) Quilt-to-be?

Progress: slowly making a collection of blocks - I can't call them random, but there's no plan or pattern to follow either.  

Oddblocks: Floral + Stripes 

Recent Progress: still slowly making blocks with these fat quarters. I'm not sure what the plan is yet.


Denim Quilt: 


Recent Progress: none
Yet to Do: back, quilt, wash
Times two actually. More on that later... 

Doodles


No Recent Progress
Yet to Do: baste, quilt, bind, wash

Pansy Patch Project


No recent progress.
Yet to Do: finish piecing tops together, make back, baste, quilt, bind

Welcome Baby S II Quilt
Yet to do: Wash
This is just a sneak peek - and it's all I'm willing to share for a while.


Waiting to Start:
  • Teddy Bear Blanket II
  • Welcome Baby SII Package (and Quilt)

18 March 2013

Playing with Meatloaf

As I've said before, I'm not a huge fan of meat loaf. Actually, I'm not really a huge fan of meat. But ever since finding the recipe for meat loaf with Stove Top stuffing instead of bread crumbs, meatloaf has been a bit of a fixture around here.

The first several times we made it were fairly simple, more or less following the recipe that worked for our oven/altitude:

1 lb ground beef
1 box stuffing
2 eggs
1/4 cup water

Then I came across a pin for a gluten free Italian seasoned meatloaf with tomato sauce and cheese in it. Rather than messing with something I knew was working, I just added the concept to what we were already doing:


Provolone on top was not the best choice (it's what we had) but the addition of the parmesan to the meat was amazing. And I even survived the tomato sauce.

So, on nights we're feeling a bit more adventuresome, we add:
1/4-1/2 cup parmsesan cheese
the top it with some garlic/bold tomato sauce.

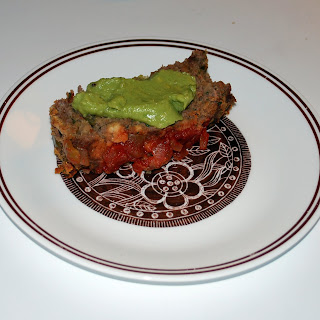
That worked so well, it got me wondering what else we could do with the meat loaf recipe. So, I came home with a jar of salsa and went to town. With the addition of about half the jar of salsa to the meat (and cutting out all the water), we wound up with the best version yet!


Topped with a little fresh salsa and guacamole - and I could eat it all day!

When we added barbeque sauce or the tomato sauce, we added the sauce about 5-10 minutes before the loaf was finished baking. I would not recommend doing that with the salsa version, just add it to the meat, then do a fresh topping when you're ready to eat.

I can't wait til spring to try it with fresh salsa.

But yes, now I'm still wondering what else I can do to this dish to make it a little more interesting... Any ideas?


14 March 2013

Personal Problems...

You've probably heard by know that Google Reader is going to retire in July. I'm not pleased about that, but at least I have several months to try to figure out what to do.

So, I'm currently attempting to learn to appreciate Bloglovin, rediscover how to actually use Tumblr instead of following people through Reader, and dig through thousands of starred posts to save the most important on Pinterest...

Sadly, it looks like my antivirus vs. Google Reader issues are going to turn into antivirus vs. Bloglovin issues. So I can only work at this process for a few minutes before things crash.

It's not going well.

Anyway, I'm going to give myself another hour to work on this junk, then I'm going to put it aside for now and try to do something more fun. Like maybe test drive the sewing machine that wound up on my doorstep last night, or unpack from my weeks worth of vacation.

So, give me a day or two to catch my breath - and do a little more photo editing - and I think I'll be back with some more progress and just maybe a tutorial. Yikes!


13 March 2013

My 10th Quilt: Happily Ever After

I wish the weather had cooperated and given me one good day for taking final photos of this quilt. I feel like I was never able to capture just how beautiful it is. But mud and slush and blizzards don't make for very good photo options, so we'll make do with what I could get.

A long time ago - okay, June/July of 2012 - I started planning a quilt I was going to call Rainbow Road or Wonky Stars. The sketch started out something like this:
While I still want to make that quilt someday, over time, this quilt morphed in to something a little simpler and a lot more appropriate for A+L.

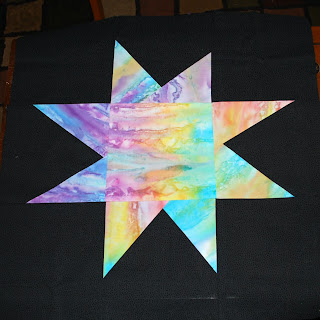
Some amazing batik rainbow tie-dye type fabric plus some black fabrics...
A lot of pre-cutting (which is a habit I should really keep up - although next time I should be smarter and make long rectangles of stripes to then cut down instead of making each square individually)...
A series of small wonky stars...
A lot of patience in building larger and larger blocks...
And I wound up with a top that hardly needed squaring - and was begging for an ideal back.

One large wonky star...
One machine stitched label - and ideal name for this quilt...
And a lot of scraps went into making that back.

Machine quilting more or less in the ditch (usually less)...
Black bias binding added with color changing thread...
A little fancy stitching outlining three of the stars (and I still wish I'd been able to do more, but not through my machine with this massive of a quilt - this would have been a great quilt for quilt as you go).


 It overlaps on every side of our king size bed - but not by much.

 A little more wrinkled after a machine wash and dry, but ready to go to a new home! It wound up just under 80 by 88 - which was what my math told me it should be...
One final glamour shot of those beautiful colors - and the shiny thread - and off we went for a celebration of love and a long weekend with family and friends!

I have absolutely no intention of taking on such a massive quilt again for a long, long time - possibly until I have a better machine quilting area or a machine that can handle such things better - but I am thrilled with the outcome on this quilt.

While A and L both seemed to appreciate the quilt, and I know L's mother knows enough about quilting to appreciate what went into it - as well as the quilt - since I may actually find the courage to share my blog address with people now that this secret project is no longer a secret, I'm going to go back to when I began debating this project and re-share my thoughts from then:

"I came across the concept of a Ring Warming Ceremony for the first time during our wedding planning. Basically, the wedding rings are passed through the guests, giving each guest a moment to say a silent prayer/blessing for the marriage before the rings are used in the ceremony. In a way, each hand made item is a bit of a Warming from me to the recipient. Even when I'm rushing to finish, I'm still trying to pour the hopes and dreams I have for the recipient into something tangible. I'm remembering the quilts I had growing up, the costumes and picnics and games they played roles in, wondering if the one I'm working on will have even a moment of being as important. I wonder if the recipient will ever touch it and know that someone spent hours thinking of them and how special they are. It's my own little Warming Ceremony, even if the recipient is unaware that's what's happened. 
It isn't really a question of to quilt or not to quilt. When I read my own reasoning for why I want to, how can I say no? Even though I'm terrified of the size and scale of the project I'm about to commit to."

And yes, this was an absolute success for me in that aspect as well. The hours spent cutting, sewing, and crawling around with a steaming hot iron were also spent hoping that A and L will have a wonderful, love-filled adventure of a lifetime together. And if the week we spent with them was any indication, then I think they are well on their way down the path of Happily Ever After.


Ultimately, even as I say I don't want to take on something this big again, I know there are other people in my life for whom I would take on something like this - hot irons, crawling, and pulling beastly piles of fabric through a tiny machine throat and all. 


11 March 2013

Happily Ever After - Home!

While my 'it's finished' pictures are still being held hostage by my other computer, I can officially say that not only is Happily Ever After quilt officially finished, it is now officially home too!


Being a bit shy, I'd intended just to slip it in with the other gifts and not say anything - but my husband had me show it off the day before to L's mother (who cried when she saw it) and then all the mothers had me present it the next day... so it was a bigger deal than I'd anticipated... but that's okay too. It's good to have a supportive husband, even if he is a bit more outgoing than I am!

In addition to giving away HEA quilt, I've been partying (and working) my legs off.
 Even after days of wearing those heals to get them worn in, I was so not prepared to stand in them that long. Or dance in them (though anyone there could make some valid points about my preparedness to dance period). Or any of the other things I tried to do in them including aiding in the decorating (see above) and tearing down after the party. Thank goodness I had super comfortable snow boots to change back into eventually (and for hiking through the snow in the parking lot!).

Alright, more pictures to come - after I'm a bit more recovered and fight with my other machine a bit more!

09 March 2013

Pinterest Challenge: Clutch

I've been working hard to empty my closet of things I simply don't use. Going through the clothes was fairly easy, though I could go through with a fiercer attitude and still cut a few more items. Going through purses and bags has been harder. It's hard for me to get rid of a bag - partly because it's just about impossible for me to find one I want to buy - but there's just no reason to keep things like the purse I've used once in two years of owning it.

So, I'm down six purses - and I'm still arguing with myself over whether to part with one more or not. seven purses at last count.

But getting rid of purses makes me want to buy more.

I could beg legitimate need on this one. I mean, everything I have left could be used as a suitcase by some people. That's not quite what I want to take to a wedding...

But instead of spending time searching stores for the perfect clutch or small bag, I turned to Pinterest. After following a few dud links (either leading to no information or turning out not to be what I wanted after all), I found a Perfect Tutorial. I love that this clutch is more than just a bag with a zipper on the top - it's got a little flap to cover the zipper too (and an option for a secondary closure there). I'm not a huge fan of exposed zippers, so that flap sold me.


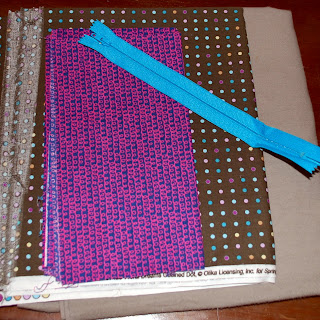
Gray flannel I bought with the hope of turning into a couple bags. Gray with dots that I never managed to turn into a baby dress. Navy with pink doodle swirls left over from a baby skirt. And my first ever zipper. Yeah. That's not intimidating at all...

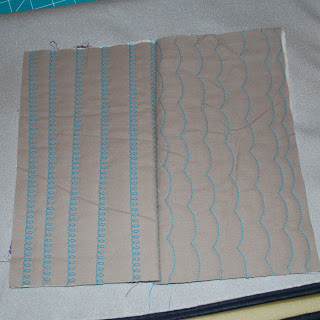
I tried to follow the directions while accomplishing what I wanted - which worked most of the time... But I probably should have just followed the directions on the first time through. The major difference was that instead of using sew in stabilizer (which I do not have), I used thin batting and did some decorative stitching on the outer layer/batting to add some stability. That made my project a bit fatter than I expected, but it wasn't impossible to handle.


The doodle stitch took about 3 minutes per line, so I went with something way faster when it came to the panel that would be seen the least (covered by the flap).

I wasn't careful enough when it came to working with the zipper. Not only did I break a needle, my seam allowance wasn't quite large enough when I put in my basting stitch - so I didn't quite have enough fabric to sew the zipper to! My fault for not following the directions closely enough. I think I fixed it, but it's not quite as pretty as I'd like at the close-end of the zipper.


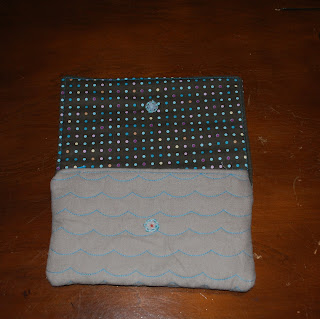
The outside however is as pretty as I'd hoped. So much so that I'm debating getting another zipper and trying for a slightly larger version...


Hand stitching on the snap was not beautiful. I'm not thrilled with the outcome of the snap - the placement doesn't seem right to me and my stitching leaves a lot to be desired. If I do this again, I will probably look for another solution. Especially after stabbing my knuckle while finishing up the last stitch.

I don't have a good picture of the interior but I used the pink/navy to make three credit card size pockets and two larger pockets. I'd hoped these would hold my phone, but it doesn't quite work (the bag is too short for the phone to be vertical, and my pockets are too narrow for the phone to be horizontal). After unpicking a line of stitching, it works now. I'm still attempting to find a way to cover the batting or maybe serge the open ends though...

So, there was blood and there was a broken needle, but I will absolutely be doing this again. I will probably cut things a little larger next time - if not enlarge the whole thing slightly - and I now know I need to be way more particular about seam allowance and accuracy on this. But, my first clutch - and my first zipper - and I survived both experiences!

Now to convince myself to do the things I need to do instead of making another.

08 March 2013

A Little Memory Project...

Last week when I was trying to pull together Agent N's birthday package, I finally decided to give something that's been on my 'to do' list for almost two years: a cloth memory game set. I really intended to save that for a Christmas gift - especially since he's probably still a little young to really appreciate it - but I was procrastinating on Quilt B  had some time and I needed a little more in the package. Not the greatest reason for giving something early, but I decided to go for it anyway.


When making memory game sets in the past, I've gone through a lot of felt by making 'frames' to fit around the fabric squares. I was the kind of kid who marked the Candy Land cards (and the Uno cards), so for me, it's important to minimize the possibility of seeing colors at the edges. This time however, I didn't quite have enough felt left to do that - so I took another approach, and hey, learning to check the edges for hints is another part of learning to play the game... right?

The process was simple:

  • stack the felt and print, right side in
  • stitch almost all the way around - hitting all four corners - but leave a small opening to turn it (back stitch on either side)
  • clip the corners 
  • turn outside out
  • top stitch making sure you close the opening where it was turned
Easy. Not quite what I'd call fast - especially not when working with that size of squares - but it's easy to get into the grove and burn through them without much thought.

My favorite part by far was choosing the 16 sets of 3 inch squares. Digging through my fabric scraps is almost always fun. I didn't have a plan for colors of themes, but by the end, it was a little heavy on ones with blue as the dominant color. Once that was getting obvious, I did throw in a few loud red-ish ones just to break things up a little more.


It's hard for me to pick a favorite fabric from any of the sets I've made, but I'd probably have to go with the musical bugs. At least in this set... The pink/yellow flannel piece looks more intense in this picture than it is in reality. Oh, and I'm not sure Agent N's mom will appreciate the sushi fabric quite as much as I do, but hopefully everything else goes over well.

So, I'll be waiting to hear how these go over (even if it's like a lead balloon) before I give away a set to my next birthday child (or save them for Christmas several months later). I think I was playing memory fairly early (thus the teeth marks) but maybe not quite as young as the kids on my list...

05 March 2013

Twin Quilts: Quilt A Pieced

After finishing the front - completely - coming up with the design for the back was fairly simple.

Since I had 12 half-strips of the pink/red/blue colors leftover, I made up two strips to add to the back - both to give a little interest and because it was almost exactly how much additional height the width-of-fabric needed to fit the front.

Unfortunately, this happened while the camera was charging. So cell phone pictures it is.


I already forgot I had to add a little bit of orange to each stripe to have enough width. It looks a little out of place at the moment - but my hope is to bind both quilts with that same orange, which should help tie those two spare blocks in a little better.


I promise this fabric is cuter than my cell phone camera makes it look. So is the back for that matter.

I'll try to get some better pictures of the back of Quilt B - or of the two backs while I'm basting. Because these really don't do it justice.

04 March 2013

Twin Quilts: Progress on 'A'

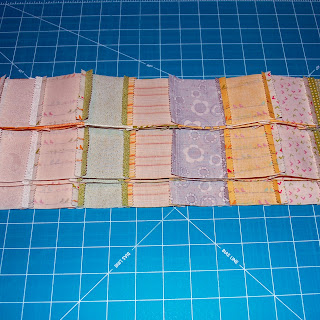
Since I only had 12 neutral strips, I cut each strip in half so I was working with more-or-less the same size pieces of fabric. This leaves each stack with 12 half-strips of only the different colors to use later - I'm thinking in a patched back or possibly doing a scrappy non-bias binding?

Stack A in front, Stack B in back
At this point, I set the fabric for Quilt B aside to concentrate on Quilt A.

I mixed the strips up in a not quite random order. I wanted a distribution of each of the color schemes throughout, but I didn't let myself get focused on which patterns were next to which, or which colors were next to which. When I felt like the order was fairly well mixed, I started sewing the strips together.

Some of that silvery/gray is my ironing cloth
I pressed the seams open every time. And now I understand those tiny irons I sometimes laugh at in the store. It would have been much easier to only press one seam at a time than to have to be watching three or four.


Eventually I wound up with all the strips pieced together, and all the seams pressed open. You'll notice that I did work to keep the selvage ends all on one side, which was about the only truly intentional thing I did in piecing these strips. It was my goal to only have to trim off one side to even things up - though you can see that didn't quite work out, but close.

Next stop? Back to the cutting board!


It was my goal to use two 5 inch wide strips and two 2.5 inch wide strips, which left me one larger strip, just about 6 inches, for adding to the scrappy back. It seemed perfect - my math suggested I would need 5.5 inches of scrap to add to make my plan work. Notice the tense there?


Adding in the orange stripes was fairly easy - though it required some pinning to make sure those seams remained pressed open. About every fourth or fifth seam was enough to hold it together and continually remind me to be watching the rest.


And in a matter of an hour, I had a fully pieced top.

Whoops.

Although it doesn't look it in that image, it wound up too 'skinny' for the height. Especially when I thought about adding a head/foot of orange. So I pulled out my measuring tape and realized my mistake. Instead of using 5 inch pieces of orange, I used 4 inch pieces. So the quilt was just under five inches smaller than I'd planned (give or take some for seam allowance).

Remember that extra 6 inch wide piece I was going to use for the back?

To the rescue!


That's a better sized top. Though I still may add the two horizontal orange stripes. It looks good now, but in my sketches there's no comparison between with and without.

You might be able to see that the strips are just a little longer than the orange stripes, which are cut at width of fabric. And again, I'll have some selvage to trim off. That wasn't in my plan, but I tried to offset it so I'd miss a little of each top/bottom strip and keep a little of each.

If I don't add the horizontal orange, I should be able to back it out of a single cut of fabric. But that's not quite as fun as making a colorful coin-like stripe with my remaining 12 half-strips.

My real question now is this:

When I start on Quilt B, do I make it exactly the same as A, or do I measure the orange correctly and give it only the four sets of 'coins' I'd planned for? I think go to match A, but my husband disagrees.