30 April 2014

Quilt #21: Bluebird Park Star

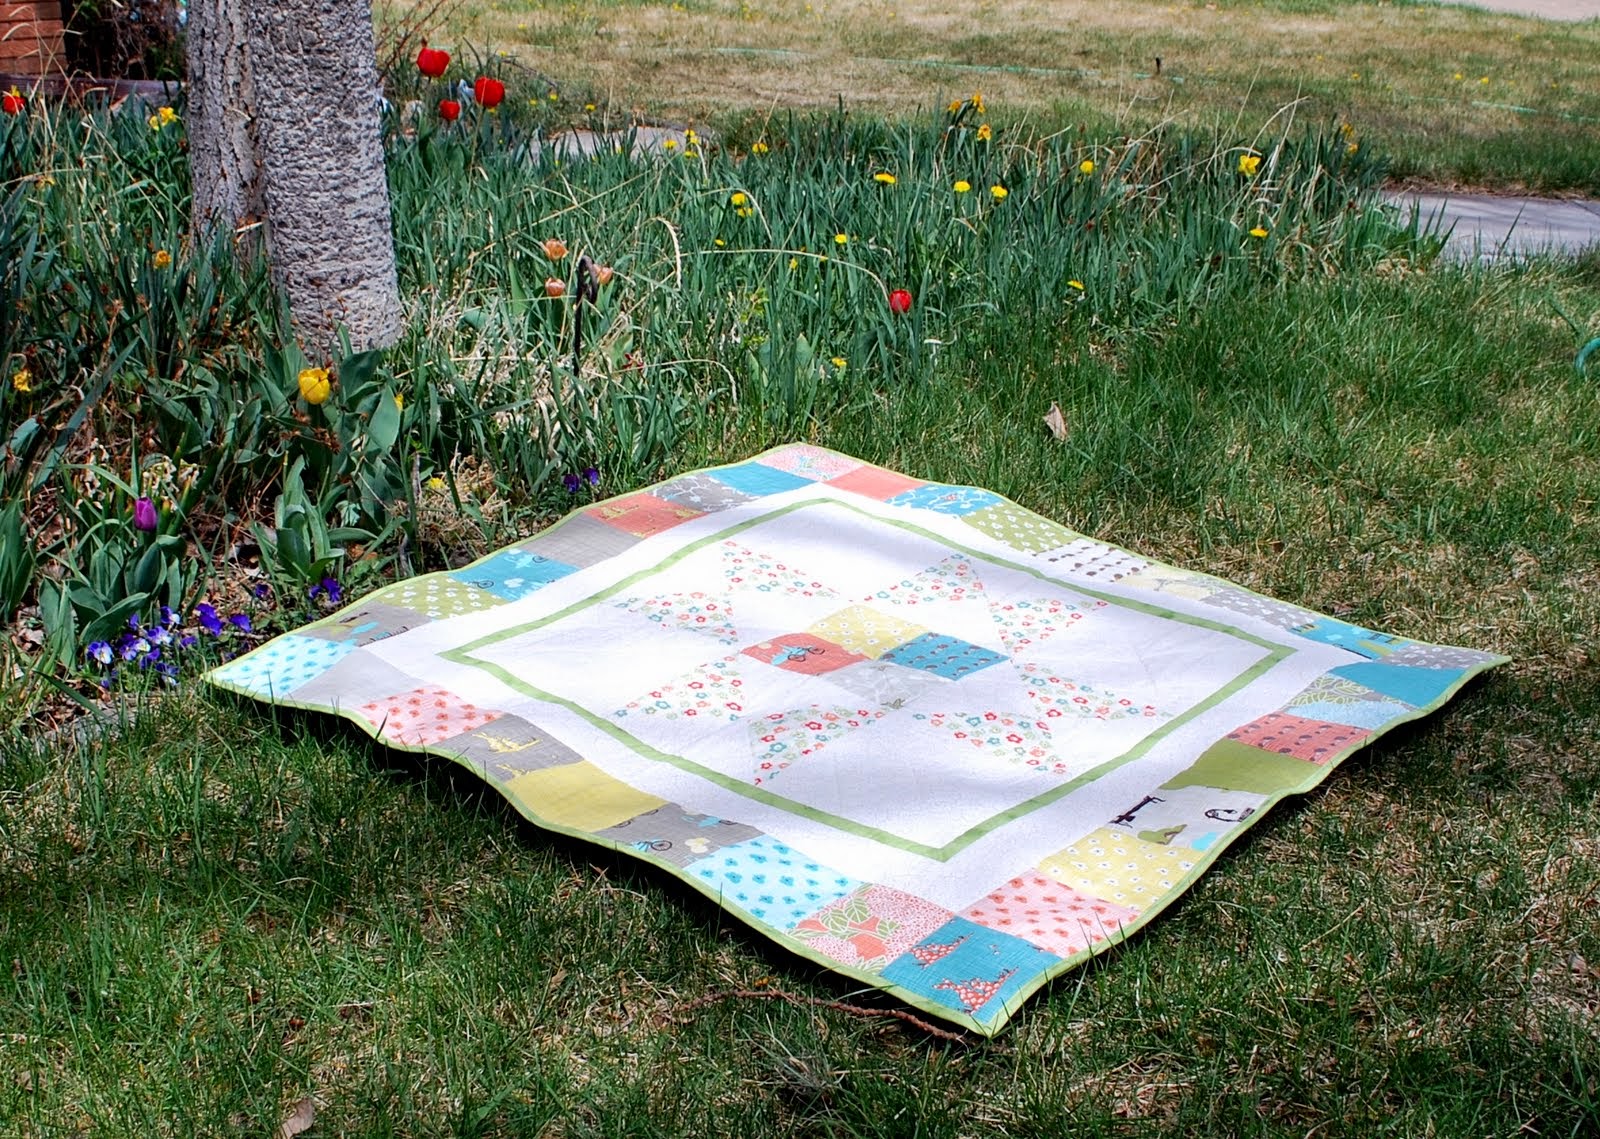
My 21st quilt "Bluebird Park Star" is my first finish of 2014! 

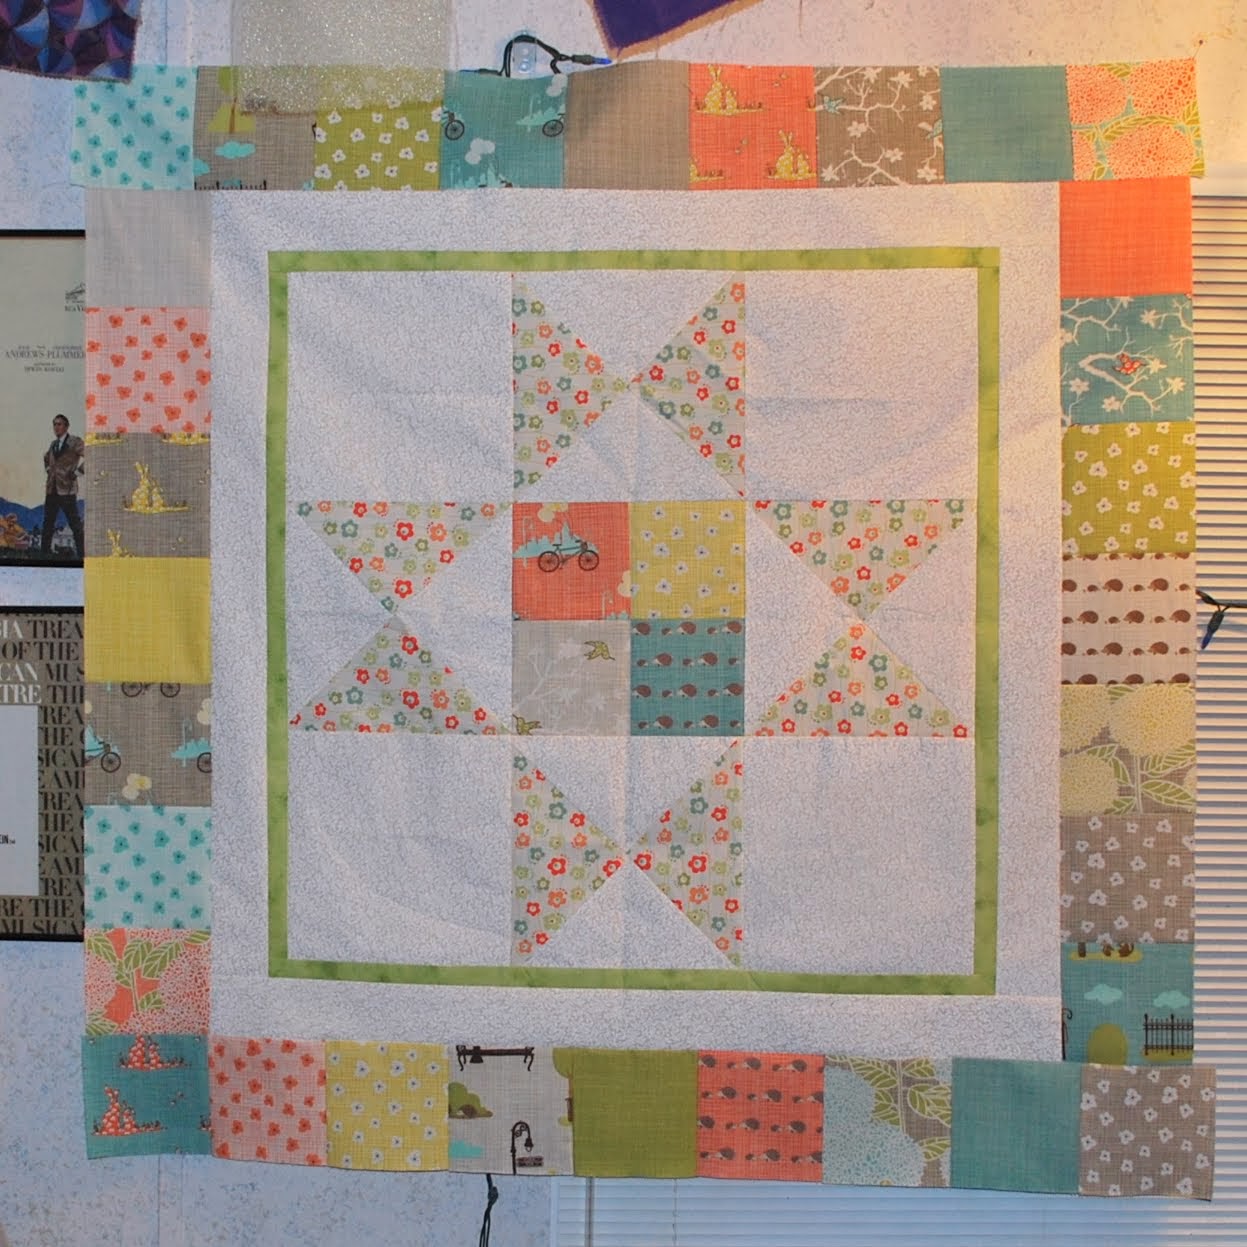
I fell in love with the Story Book Star quilt the moment I saw it over at Moda Bake Shop. The recipe is from Kristan Kremer at Doodle Do Designs - and I'm also very grateful to Moda Bake Shop for introducing me to her blog. So many beautiful things there to drool over -- and I really want to try my hand at her Scrappy Little Heart Block tutorial. 

I'm probably a year early in making this quilt (if it goes to who I have in mind) but I just couldn't bring myself to wait any longer; so the moment the fabric arrived, I started searching for coordinating yardage and mentally arranging the blocks in the layout. Kristan's tutorial was easy to follow - even the new-to-me steps of making the 'star' pieces. Mine aren't perfect but I'm pretty happy with them -- and I really want another reason to make this quilt again and try to improve them. 

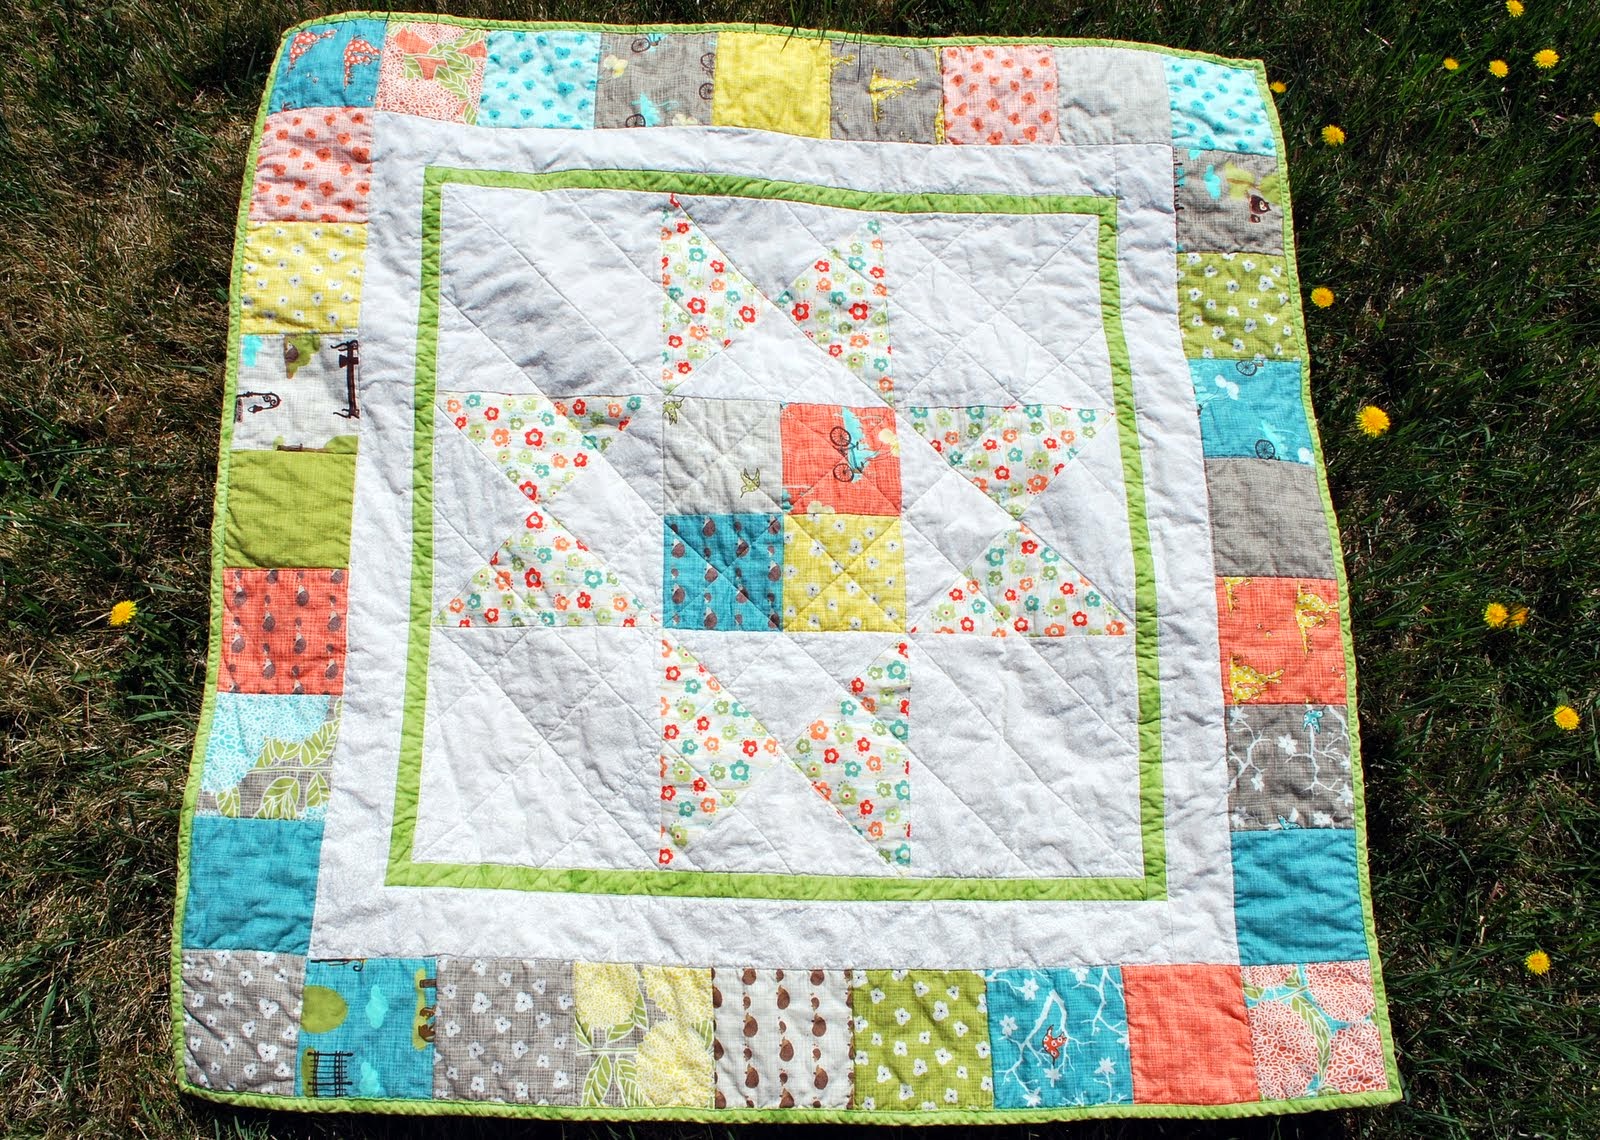
Of course, I struggled to get good photos of this quilt; the light colored background that I used really reflected the sun back at me and made both photos and editing a real challenge. 

I'm really pleased with how this turned out - and the flannel back is too adorable and wonderfully soft. It could have been more coordinated looking over all if I had used Bluebird Park yardage, but truthfully, I'm very happy the way it turned out even with the yardage pieces being different. I think I especially like the green that we chose for the little border and the binding. 

The quilt finished at just about 41" square. For quilting, I kept things pretty simple with straight lines and stitch in the ditch, though this is another where I think a stipple or other wandering stitch would work really well. There were six charm blocks left over, as well as a little left over yardage since I over bought slightly, so I'm working on coming up with small coordinating project (maybe a bib or two) to go with it. 


29 April 2014

Bluebird Star Almost Done

I had hoped to set aside an entire day for binding several of my quilts that are ready for it - but while I like the finished results of making my own bias binding, it isn't the fastest project and I managed to spend all the time I had set aside on only one quilt.
By the time I'd finished, it was way too dark to try to get any photos of the whole piece, so I had to settle for this quick self-reward photo and wait until after work the next day to get any photos of the finished quilt pre wash.
Which proved difficult. I need to start making quilts with darker fields - or learn how to take photos of such bright faces. Morning light is usually impossible for me to use - unless I can drag myself out of bed at 6 or 7 on the one day a week I know I won't have work - and even partly cloudy sun was enough to turn this one blindingly bright.
We don't have many flowers here this spring - unless you count dandelions (I do, but I'm the only one here) - so trying to get a picture with anything more than still-dead-looking grass was a challenge too.

Bluebird Park Star is such a happy, spring-like little quilt, it really deserves a better backdrop than sad grass...
This might be the best photo I've taken in terms of showing off the quilting I did on the center square. In one direction I quilted 9 diagonal lines, in the cross-direction I only did 3. I wanted the center four blocks to have Xs through them - even though I still struggled to stitch over animals and faces, sorry hedgehogs - but I didn't want to do too much quilting on the center overall since I knew the outside borders would have very little.

It looks good so far, but the final test will of course be washing it. I think the batting recommended quilting be 4" apart at the maximum - and I know that on the outer border it's nearer 4.5" for some of the blocks. I'm only a tiny bit nervous, having never had an issue before with quilting being too far apart, but I really don't want to try to add lines through all those blocks. Especially not now that it's bound! I think the 4.5" or smaller blocks ought to be find since they're stitched on every side - twice on the binding side - but of course, I'm a bit of a worrywart. But, the best solution is to find out - so I'm off to start a wash!

28 April 2014

Bluebird Quilting

I might be faster at finishing quilts when I can sit down and concentrate on one from start to finish, but recently I've been a lot less focused one finishing and a lot more interested in bouncing from project to project. So, while I'm processing what to do with the S'mores quilting or binding, I'm using this time both to pre-wash binding fabrics for other projects and to turn my attention back to my Bluebird Star quilt.

Since my backing material was only a couple inches larger than my quilt top I chose to go with fusible batting and a steam activated basting. I'm not a huge fan of steam basting, but I didn't want to worry about any movement or puckers with this one - since it could result in my top falling off my back. I'm not won over, I think I still slightly prefer pin basting overall, but there are times when fusible seems to work slightly better. The steam basting should last for a while, especially if it's just sitting to the side instead of being worked on, but I had the time, so I jumped right in to working with it immediately. 


Once I started, I didn't want to stop - both because I was feeling inspired and because the steam basting isn't strong enough to hold up to much quilt wrestling and the corners were less basted than I had hoped for. 

I don't think you can see the quilting at all - but I promise it's done. On the inner most area, within the green border, I went with diagonal lines across the star. I went for some less than obvious (almost) stitch in the ditch type quilting on the edges of the squares - the seams between the border blocks, around both (inner and outer) edges of all of the borders, and around the inner four blocks. 

I upped the 'shadow' on the photo significantly, but it's still hard to see the quilting. 
It's easier to see on the back side of the quilt - also, check out the adorable hedgehogs! I just love this fabric! 

I had intended to go through the green border with a specialty stitch, but at this point, I think that might be a little too much for the quilt - and for my machine. I don't know where to lay the blame (probably user error) but I was having major tension issues and tangles all the way through the straight line quilting - so trying something more complicated seemed like a dangerous idea. I have used flannel as a backing before without this problem, so I don't think that was the reason for my issues. I did swap to a brand new needle part way through and things were better after that, but maybe it's time for the Janome to take another trip to the shop... 

The binding will be the same fabric I used for the little green border. For not being intentionally from the same fabric line it goes well with all the various shades of green in the charms - and I think it'll tie everything together. 

25 April 2014

Still Spring

I still think it's spring - and I still am not the only one around here! The crab apple tree is leading the way - but all the fruit trees are beginning to break out in blooms and bees. It's kind of fun to walk under the trees and hear the bees buzzing above everything else.


I'm also glad we trimmed the trees up before they bloomed - so the blossoms and bees are all well above head level this year! It makes me feel a little less nervous about standing under 'their' tree for a few minutes.

24 April 2014

Hopeful

I am not a winter person. I understand why it happens, and I know that there are days that are lovely, but give me spring any time! I'm sure we're not out of the wintery-woods quite yet -- after all, I've known it to snow in May and June -- but looks like I'm not the only one thinking that this might finally be spring.


23 April 2014

S'mores Quilted

Since we had a couple rented movies to watch this evening, I happily spent about three hours quilting on my S'mores Love quilt.

Using a similar quilting style as in my beloved Happy Go Lucky quilt, I crossed the quilt top with loose chevron style zig zags.
At this point, the quilting isn't particularly heavy. Parallel lines go the length of the quilt in the center of each charm, as well as in the ditches when they come together. Right now, each block has at least one set of lines (either two or three lines) going through it in the shorter direction - sometimes slightly more.
The top could be more densely quilted without becoming overdone. I'm toying with the idea of adding single lines (instead of the pairs and trios I've done so far), but I think I'm at the point where I may be over thinking it. I'm going to step away from this one for a couple days and come back to it with fresh eyes and thoughts.

I also probably need to go shopping to come up with some binding fabric - so it's a great time to take a few days to think before I take the next step, which ever it is!

22 April 2014

2013 Cross Stitch Portrait -- Finally!

I can't believe we're already coming up on the end of April and not only have I zero completed quilts to show for 2014, I'm only now finishing the 2013 cross stitch portrait I had hoped to finish in January! Like everything else I'm working on right now, there's nothing complex about the pattern, or the process, I just haven't been able to set aside enough time to do much of anything!
Although I plan out the stitches for the people, I tend to just freehand the numbers -- and this year, I was a little closer to the heads than I had hoped. Unfortunately, by the time I realizes that, I was pretty dedicated to the plan and just went with it. Yes, I could have grabbed my trusty seam ripper and taken the stitches out even though they were a little too wound together to un-stitch, but the orange thread left a little bit of color behind, and I didn't really want to deal with all those slightly orange dots and paths. I also figure no one else will be quite as critical towards it as me, so if I can live with it, it should be just fine. But next year I hope to be a little smarter about it.

Getting a photo of all four portraits together was a struggle. Between the glare from the flash (even when I dampened it) and the glare from the lights in the room, this is the best I was able to get.


Overall, I'm not displeased with it - but I wish I'd paid more attention to the lack of contrast between the cat and 'my' outfit. On paper and in my plots, it looked like enough contrast, but in reality, a little more contrast would have been better. I'm also not sold on the shorts for Greg, but he's happier that it's a more realistic representation of his usual outfit.

It might have been nice if I'd planned for things to be a little more coordinated or regular through the pieces - like our placement within the frame - but at this point, I'm also beginning to suspect that I should have just put a single large piece in a frame and added to it instead of doing each one individually. I think 2014 will be individual as well, but at that point (since I'll be out of room on the wall anyway) I'll begin thinking about starting 2015 on in a larger frame, or possibly redoing these in a larger piece.

All that said, I also kind of like the random placements. It kind of fits with how we live around here - a little wonky and a little random!

I think I'd better start the 2014 portrait in November or December, just to make sure it gets done in a more timely manner!

21 April 2014

Pinterest Challenge: Bubble Up Bakes

Dinner: Taco Bubble Up Bake
Inspiration recipe from The Seasoned Mom, found via Pinterest

Canned biscuits, taco sauce, ground turkey, taco seasoning, and a little cheese.
Result: All four testers thought it was pretty good - but I think it needs a little something more. Sour cream or guacamole would have been an interesting addition, but I don't think it's what I wanted. I think I wanted something more like olives or lettuce.

We've tried it twice now and I'm still not certain I like it. Sometimes the biscuit seems to work well, other times I feel like it's just a little too sweet for my (very picky) taste. It's an easy enough recipe to make, and doesn't call for much in the way of supplies, which I like, but I feel like it needs a little bit more refining or something before I'm 100% happy with it. I wonder how it would taste with cornbread instead.... Hmm... Maybe I'll try that next!


Dessert: Apple Pie Bubble Up Bake
Inspiration recipe from Recipes for My Boys, found via Pinterest

Frozen rolls (defrosted and allowed to rise), apple cider, apples, brown sugar, and a powdered sugar glaze.


Result: While one person thought it could have used more apples, the rest of us thought that the issue was that as the dough cooked, it rose and pushed the apple pieces to the bottom rather than staying quite as well mixed as we'd have preferred. That said, the flavor was amazing and I am already thinking I should make it again tonight. Much easier than making pie, and so, so delicious.

I did use a little bit of apple cider mixed with powdered sugar to make a quick glaze to pour over the top of each serving. I like to give everyone the chance to control how much sweeter their own portion is - and I wasn't certain if we'd have leftovers or not (we didn't, but if we had, I think things store slightly better without glazes and frosting).  I think I might cut the rolls into slightly smaller pieces next time, which might help them mix with the apples better. I may also try keeping a small part of the apple mixture to pour over the top just before baking. I am definitely trying this one again though.

17 April 2014

Bluebird Star Top

Whoops - I meant to share this before I got into all the flooring stuff, but instead the post - much like the quilt top - has been sitting around waiting for me to get my act in motion again!

It didn't take long to finish up the outer most edges of the Star top. I think I spent more time trying to 'randomly' arrange the prints between the four sides than I did actually sewing them together or attaching them to the rest of the top.
I'm a little disappointed about the way the borders came together. It would have been happier if they'd ended up nearer to square so the corner blocks could appear to belong to either horizontal or vertical border. I almost accomplished that in the lower left corner, but the rest are very misplaced.

I don't want to pick the two horizontal sides off, open them up and increase the seam allowance on each a little bit to get them nearer square - but I think I would like the outcome better if I did that. 

I'm going to sit on it and think for a while. I think it'll look better, but it'll be a hassle and a pain. Still, looking at the picture as I type does have me wishing things were a little squarer. 
Using my trusty Paint program, I've pulled the corner blocks in the top row in a little to square up - and it looks better overall. The second block from each side does seem a little more obviously short though, doesn't it? On the bottom right I pulled a little from each of the last three seams and it looks better than the to row - and much better than without. Hmm... Maybe I don't have to take the whole thing apart to make it look a little better? 

Oh dear...


Meanwhile, how's this for a back?


I picked this darling aqua/white hedgehog flannel up on clearance a couple weeks ago (right after I placed the order for the charm pack). It'll be a close call whether I got enough to back it without piecing the back since the finished top is so close in size to the yardage size - but I think it's going to be adorable.

Now, where did I put my seam ripper...

15 April 2014

Nearly Back on Track

Replacing the carpeting in our house has taken a huge chunk out of my month - and so has the massive amount of sorting and purging we've done over the last four weeks - but the results have been completely worthwhile.

In the last two months, the living room has gone from this:

To this:
To this:

Do you see all that space!? Such an improvement on the old space - I swear I'm in love every time I walk through that room.

The living room isn't the only major change around here. Since we really purged down, we were able to rearrange the other rooms as well.

Remember the office, that room I've fought with since the day we moved in? Well, it went from a disaster more or less like this:
and this: 

To something significantly more soothing:
and 


Which might lead you to suspect that our little room had an equally great transformation.
From tight and messy quarters:
To an office just for me - which today looks something like this:

There's still some finishing work to do in the bedroom and office - like installing the rest of the quarter round trim where the walls meet the floors - and probably a little more tweaking with the office layout, but it is so much better I just can't keep it to myself anymore. The house feels significantly larger (and not just because of the flooring, taking out that much excess stuff really helped too) and cleaner in ways I don't even want to get in to. The process was horrible -- I'll spare you the 'during' pictures -- but I couldn't be happier with the results.

I've barely done any sewing or quilting since the rearranging process began (about four weeks ago) but as soon as I'm finished typing this I intend to turn on the machine and make some progress on a few things that are waiting for attention! And - I figure nothing will give me better ideas for how to re-arrange my office better than using it. So far I've only been using the desk and the charging station I've set up on the black shelving unit (near the Game of Thrones books and my iron) - which is working fairly well - but I haven't given the sewing desk placement nearly enough use to know if it's going to work.

Hopefully now that we've just got some trim to install over the weekends, I might be able to get back into the swing of sewing and quilting - especially since the 'new baby on the way' announcements in my friends group just don't seem to be coming to a stop any time soon!

10 April 2014

Quiet but Very Busy

I've been spending all my free time the last two weeks working hard getting the nasty green carpet out of here - and replacing it with something significantly nicer.

We're five hours into the last - and largest - room. I cannot wait to get my house a little bit back to normal - living in construction zone has not been easy. I'm not even sure I know where the power cord to my sewing machine is...


04 April 2014

Spot the Difference?

Last time I shared the multi-starburst quilt, it looked something like this:

Now, it looks like this:

Even knowing what I'm looking for, I can hardly spot the difference in these photos.

How about another view:

Need a couple hints?


I felt like the quilt needed a little more than just the swoopy lines, so I have outlined the inner stars in each burst. Each one is outlined slightly differently - and as you might be able to see, one of them is outlined twice (see the black/floral backing piece). I am happier with the quilting now - but still wondering if there's just a little more that I can do before it really reaches the moment of 'enough.' Without a set plan, it's always so difficult to know if the quilting is enough or not quite there!


In all honesty, I can't remember the last time I turned my sewing machine on - life here has been so chaotic I just haven't had the time to sit down and really work. I'm mid-chaos right now -- the living room, laundry room, kitchen, and office are all inside out in the middle of the house and I have company coming tomorrow morning -- but I just got news that I need to break out a fabric crush I've been hording for the future-- a future that's coming a little sooner than I'd guessed! (Hurrah for my friends though!) 


02 April 2014

April Goals

April Goals 

Personal: 
Read 5+ Books
Read 1+ Non-Fiction (can count as one of the 5+ total)
Keep time on Pinterest to less than 2 hours/day
Keep time on Facebook to less than 30 minutes/day (unless using chat with someone)
Try to get back on some kind of schedule (once the house is more rooms and less maze)

New Projects / Pinterest Challenge:
1+ new recipe

My Projects:
Finish the 2013 cross stitch portrait
Finish at least one quilt (including washing)
Quilt at least 1 quilt (baby size)  

Grown Up Junk:
Replace flooring in 2 rooms
Replace 2nd toilet
Rearrange house (again)
Continue shopping for a new computer (this one's getting slower and slower, and buggier and buggier)
Finish up that paperwork stuff


March Wrap- Up

March Goals 

Personal: 
Read 5+ Books
  • "Exile's Honor" Mercedes Lackey (reread from 2012)
  • "Jesus Feminist" Sarah Bessey (non fiction)
  • "Hollow City" Ransom Riggs
  • "Roomies" Sara Zarr & Tara Altebrando
  • "FreakBoy" Kristin Elizabeth Clark
  • "Sweet Venom" Tera Lynn Childs
  • "Ironskin" Tina Connolly
Read 1+ Non-Fiction (can count as one of the 5+ total)
Cut time on Pinterest to less than 2 hours/day. No more 5 hour Pinterest sessions.
Do the dishes every night before bed
Deep clean the fridge and freezer

New Projects / Pinterest Challenge:
1+ new recipe
1+ small project/tutorial (mini quilt, bag, or something crafty that doesn't require the sewing machine)

My Projects:
Finish the 2013 cross stitch portrait - maybe 1/3 done? 
Finish at least one quilt (including washing) - I was almost ready to wash - then we had to turn the water off for two days! 
Quilt at least two quilts (baby size) - I managed one. 

Grown Up Junk:
Email Realtor
Contact insurance company
Send info to Banker #3
Call Builder #1
Send info to Banker #1
Email Builders 2-5
Health Insurance: set up meeting, attend meeting, choose a plan,
Finish tax paperwork
Send into to Banker #3 again
Yeah, this is why I've been having a hard time accomplishing anything. This stuff is all torture as far as I'm concerned. Sadly, very little of it can be handled by my more outgoing, less shy better half. But I am asking him to handle the parts of it that he can do for me. 
Even though I did all this, I got nothing for my troubles. So, while we're not giving up on someday soon-ish, somehow getting a bigger place, I'm also finished with living with the 'we're moving any day now' mindset. The boxes I've been keeping so we could move the small appliances more easily? Already gone. The extra furniture we were squeezing in just in case? More than half-way gone. The toilet that has been giving us fits for over a year? Replaced. Next on the list? The disgusting, forest green (where it's never seen any wear) 20+ year old carpet is scheduled for the chopping block. Yeah, this means some of the savings that we'd like to be squirreling away for possible home buying adventures is going into a money pit - but after four years of living with things that make me sad, angry, or somewhat-ill, I'm putting my foot down; This doesn't have to become my dream place - or anything like it - but it's time to lose the 'maybe someday' junk that's eating up valuable space, time to lose the things that are hazards, and time to do a few little things to make this a happier place to be instead of just the place where we spend our nights. I don't know what the future holds for us and houses - but I'm tired of living a 'maybe next month' kind of life. I've done that for four years and have nothing to show for it, I'm going to start living for today and if I still end up with nothing, at least I'll have been happier on my way there!